Saturday 22 April 2017

Beginner's Tutorial: Class 1. Needle Tatting a Ring

Hi Tatters...I have made a start on some Beginner's Tutorials for those who want to learn this beautiful craft of lace making.
You will find them on the Beginner's Tutorial Page on the menu tabs above the posts. 
Links are included to my YouTube channel where the tutorial video's are uploaded so pop along and take a peek!

Happy Tatting!!


Friday 14 April 2017

Tatting Owl Necklace Tutorial 2 Released

Hi Again Tatters

Here is Tutorial  2 which as promised shows you how to Needle Tat onto a brass ring as the basis for our Owl Necklace, hope you like it! Please let me know your thoughts, I would love to improve the tutorials as I go along.


Have fun!

Thursday 13 April 2017

Hello Tatters!
Well here it is my very first video tutorial. It's a little later than planned I'm afraid but its been a new learning curve learning to film, and edit video, so lots of re-filming and cutting took place before I uploaded the video. I really wanted to add the video to my blog but hit a snag in that it's a little over budget in the megabytes department and so will not load. As a result I have had to create a YouTube channel and load it there so I can add you a link.
I hope you find it easy to follow and informative, the second video on needle tatting around a ring is well on its way so fingers crossed I will have it loaded for you soon.
Just click on the title below and follow the link.

Thursday 23 March 2017

For the love of Owls

One of my most recent projects has been for my daughter who is smitten with owls.
On one of my many trips to Spotlight our local craft store I found a lovely owl in silver coloured metal to add to a necklace and have pondered for quite a while on how to add him into a tatted piece of jewelry.
 Lots of research on techniques for embellishment, led me to try my hand at encasing a brass ring with tatting. I have to say that I haven't mastered shuttle tatting onto a ring well enough to get the look I wanted and so I did a single crochet around the hoop, and tatted onto the individual stitches.I was very happy with the finish.
On looking at this picture I noticed as you probably have that the pattern doesn't look quite right on the bottom right of the ring. Another battle with my perfectionist demon here .........
The pattern was correct but unfortunately I didn't notice the missing ring was tucked behind the necklace when I photographed him before sending him on his 15,000 km flight home to my daughter....hey ho there's a lesson learned, more pictures and closer inspection next time,
I will take you through the stages of the pattern over the next few posts, so that you can also learn the techniques used and make your very own necklace.

1. Covering A Brass Ring 

 I will demonstrate 3 techniques:-


 Covering a ring in thread using single crochet 


 Covering a ring with tatting using a Needle


 Covering a ring with tatting using a Shuttle


And in later posts I will demonstrate how the ring was embellished using:-


Tatting Ankars 


This is a technique where a large ring is made and a smaller ring links to the next large ring, but sits in front, and between both larger rings giving the appearance of two rows of tatting.

I will demonstrate techniques for both Needle tatting and Shuttle tatting.


Sunday 12 March 2017

From Snowflakes to Ice Drops!

For the past two years I have planned to Tat something lovely to add into my Christmas cards for loved ones back home, and have failed to meet my deadlines due to indecision about what I am going to Tat, or I have run out of time before the final post date.

This year I wanted to send home snowflakes for my children and grandchildren to hang on their Christmas tree's and started researching early so that I could find a pattern I liked, and practice the pattern before starting to produce the final batch.

Unfortunately I got completely lost in the wealth of beautiful patterns available, so lost it took me a long time to come up with perfect one. I love Pinterest and when I am not tatting, crocheting or quilting I can be found pinning to my hearts content on Pinterest, so if you click my link to my Pinterest page you will find all those lovely snowflake patterns to browse through to save you time trawling around the internet for patterns.

 I am one of those people who likes to challenge myself with everything, and I am also a perfectionist. Now I know that sounds great, but it actually can be quite a hindrance when you have a time frame to work to. 

So I picked a lovely pattern, too late in the the time-frame, practiced it, and made up my first snowflake only to realise I had made a mistake half way round my final layer. My first instinct ....Pull it out and start the round again, after chastising myself of course. 

So I put down my work made a coffee and took several deep breaths and thought no, I am not going to do that I will adapt the pattern to incorporate the mistake  and replicate it at the other side of the work so that it is symmetrical, and no one will know. 

Now for those of you who are also hindered by the perfectionist trait, you will already know that the little demon on my shoulder was telling me its no good you know its not perfect even if others don't, and yes the snowflake never left my craft room, and I was very disappointed in my failure to produce a homemade gift to go in my Christmas cards yet again!

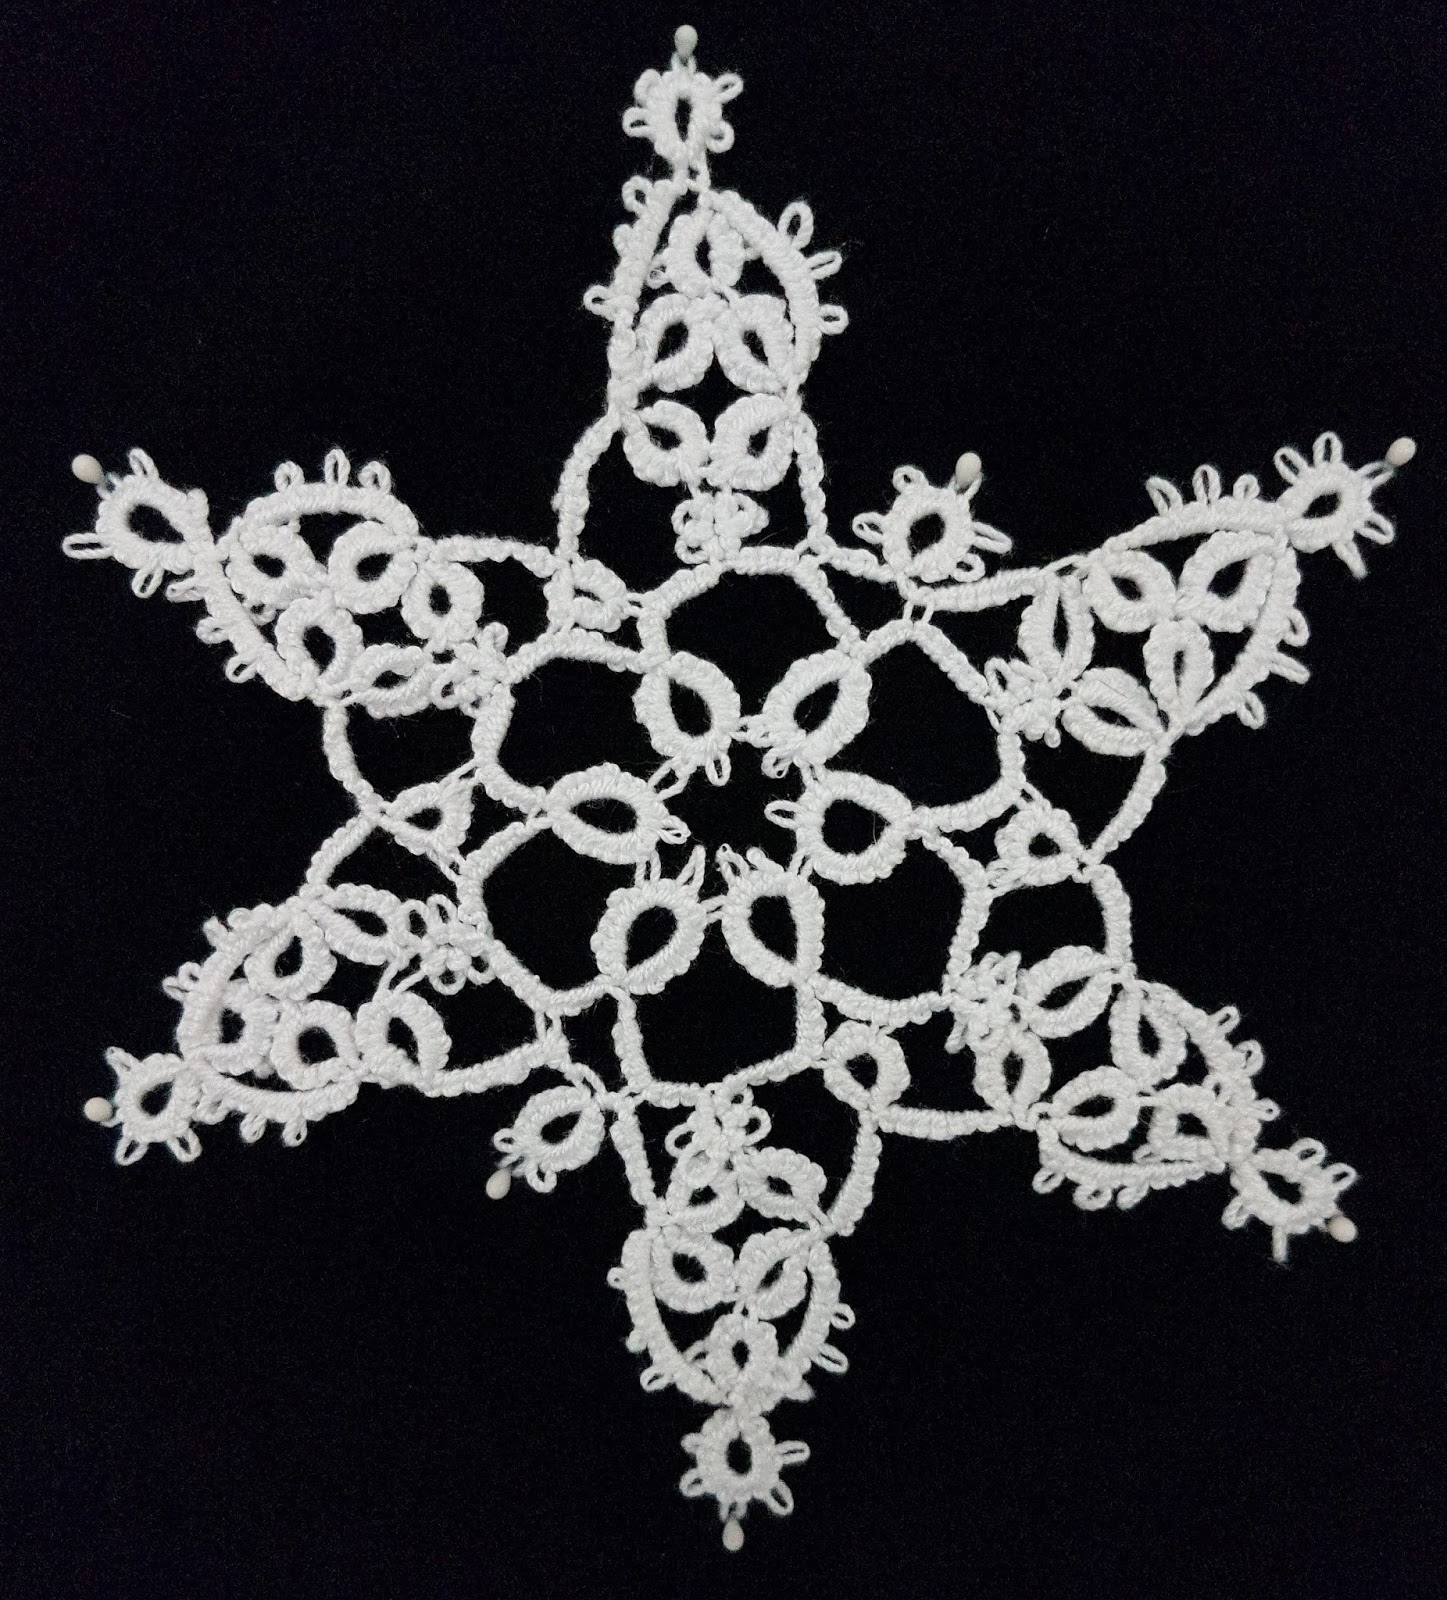
So I'm being brave and showing you my first snowflake....can you spot the mistake?


Now I can hear you asking what about Ice Drops, where do they come into the picture?
especially as we don't even get snow in Perth Australia never mind colder temperatures for ice to form.

Well I was so disheartened that I put my tatting away not intending to pick it up again until the New Year and decided to have a look on Facebook for any new sites relating to tatting that I could have a look at for inspiration. I came across a lady tatting around glass pebbles, and they look like small snowflakes. The pebbles which we used to call Dragon's Tears, but are also known as Cabochon's. You can pick them up at craft shops, pet shops (in the aquarium aisle) hardware stores (Paving Aisle or flower arranging / plant section) or online where you can find some very nice decorative ones. They come in various sizes and Diane uses the 3/4 inch pebble for her Ice Drops but you can vary your patterns to any size, and shape cabochon that you like.


 Now it had crossed my mind when making the snowflake that it didn't have any weight to it, to allow it to hang well on the Christmas tree, and was beginning to think snowflake hand made cards might be the way to go. So these little snowflakes weighted by a small glass pebble, which also gave a jewel effect which would reflect in the Christmas lights really caught my eye. It caught many other tatters eyes too and soon grew into an addiction for many, and as a result Diane Green Cademartori created a Facebook page "Ice Drop Addicts" on the 23rd December 2016 and today there are 431 members who are enjoying the ice drop projects and evolving and sharing patterns. It is a very lively group and the ice drops are a nice little project that you can practice your stitches with and have a finished product very quickly. You will be surprised by the variety of evolving patterns that have transpired in just 3 months, and I am sure you will find some that motivate you to have a go, the group has a selection of files that you can browse as a member, and use to start your Ice drop journey.
I encourage you to request membership and have fun creating these lovely little beauties.
Diane also has a blog herself and the pattern for the basic ice drop can be found in her tutorials so pop over to her blog and have a look at her beautiful work, and check out the tutorial too, it is for shuttle tatters, but there is also a video on YouTube by  Lecosedellaanto demonstrating a needle tatting technique, it isn't in English but you can follow the work easily as it progresses.
this is a picture of Diane's basic ice drop.


You will find the link to Dianes' blog Lace- Lovin Librarian here, and a link to Ice Drop Addicts Homepage too .

Here is my first variation on a theme, using two colours and adding a few picots to the centre rings, I struggled to find the glass pebbles for a while but found these large diamond shaped plastic gems in my local craft shop and thought, now they will sparkle in the lights on the tree.........


and the second evolution of the pattern......

I would love to see some of your creations.....Have fun !

PS........I am planning to start my Christmas preparation mid year to prevent another disappointment....fingers crossed!

Friday 10 March 2017

Tatting Shuttles

So it's time to talk about tatting shuttles!
Well there are many different styles out there, and they can become an addictive collectors item as easily as you will become addicted to tatting. There are three main categories with many variations on the theme.

Flat Shuttles


Bobbin Shuttles
I have tried bobbin shuttles and love the hook as it's hard to lose!
however I found them uncomfortable and the ratchet on my plastic shuttle was very noisy,


Post Shuttles


I like to work with a clover shuttle, which is in the post style of shuttle as they have a nice little uplifted tip that you can use to pull your thread through a picot, or as you will undoubtedly do many times in the beginning to undo a portion of work that has become knotted, or is not true to the pattern.


The best shuttle to have is one that fits nicely into the palm of your hand and is comfortable to work with.
Shuttles come in different materials, silver, plastic, wood, bone,


I use a separate crochet hook, although I do tend to lose it frequently so often have several on hand.

My dogs know to run for cover when I get out of my chair as they often get showered with lost crochet hooks and beads.
You can make you own shuttles, I have seen cardboard ones used, ones made from plastic  food containers, and carved from wood.


You can also decorate your plastic shuttles to personalise them with colourful paper napkins and Mod Podge.


I haven't tried to decorate a shuttle yet but Romana has a nice tutorial on this art on her blog that you may want to check out.


decoromana.blogspot.com.au/2010/10/how-to-decoupage-tatting-shuttle.html


Needle Tatting Tools

There are two types of tatting
  •  Needle Tatting
  •  Shuttle Tatting
For this post I will focus on needle tatting. 

Tools for Needle Tatting

You don't need many tools to begin tatting and for the beginner you may find needle tatting the easiest to learn first before you move onto a shuttle. 

For this post I will focus on needle tatting
Needle Tatting Tools
Needles aren't easy to find off the shelf and this can be a little frustrating if like me you decide upon a craft and immediately want to get going!

 However I found a way around that problem I used doll making needles to start off with, they are long and allow you room to create your stitches and are very cheap, I paid around $2 for a pack of 3, there was only one in the pack at the correct length but at that price I thought it was a good way to start. The needles are sharp and so blunted and smoothed the tip with sandpaper first before using it.
I made my first bracelet using this needle while I waited for my set of tatting needles to arrive in the post after ordering them online.
 Needles come in a variety of sizes and the finer the needle the finer the thread you use and the more delicate the lace you produce.

The two needles in the picture on the right are my first doll making needles, and as you can see the long needle is very close to the size of the far left tatting needle.
I have included a sizing guide for both thread and needle. Working with a size 3 or 5 needle is much easier for learning and size 10 cotton. Once you have mastered the techniques you can work on finer lace.


It's also handy to have the following tools for either needle or shuttle work:-
  •  A couple of crochet hooks in your work box to pull threads through picots for joining, and for threading beads. I like to use a 0.75 mm to go through tiny bead holes and a 1.3mm, or 1.5mm to pull thread through picots as the tiny hook can split the thread.
  • Some general sewing cotton to assist in the threading of small beads or beads onto picots
  • A pair of embroidery scissors
  • A couple of paper clips for beading 
  • Or a safety stitch marker used for knitting or crochet - * Do not use safety pins as your thread will become lodged in the spring and may split or break.
  • A needle threader especially if you are like me and struggle to see the eye in the needle!
  • A little note book and pen is also handy to write down your pattern or draw a picture of what you are working on with the stitch numbers added.


And finally we need thread!


Thread needs to be tightly twisted and highly mercerized, strong, smooth, have a nice sheen and be easy to work with. Crochet cottons are ideal for tatting.

What on earth is mercerizing I hear you say! I asked that too

Well it's a chemical treatment applied to cotton fibres or fabrics to permanently impart a greater affinity for dyes and various chemical finishes. Mercerizing also gives cotton cloth increased tensile strength, greater absorptive properties, and, usually, a high degree of lustre, depending on the method used.
 It's strength makes it ideal for making heirloom pieces that you want to pass on to future generations.

These are the threads I work with but there are many more on the market, when you read tatting blogs you will hear the name Lizbeth thread mentioned often, it is a favourite of many tatters. I have also had success with Milfords threads and DMC cotton threads. I will add some links of suppliers in my links in the right hand sidebar of my blog, but please send me links to add if you find a good supplier.

So we have the tools to begin needle tatting!